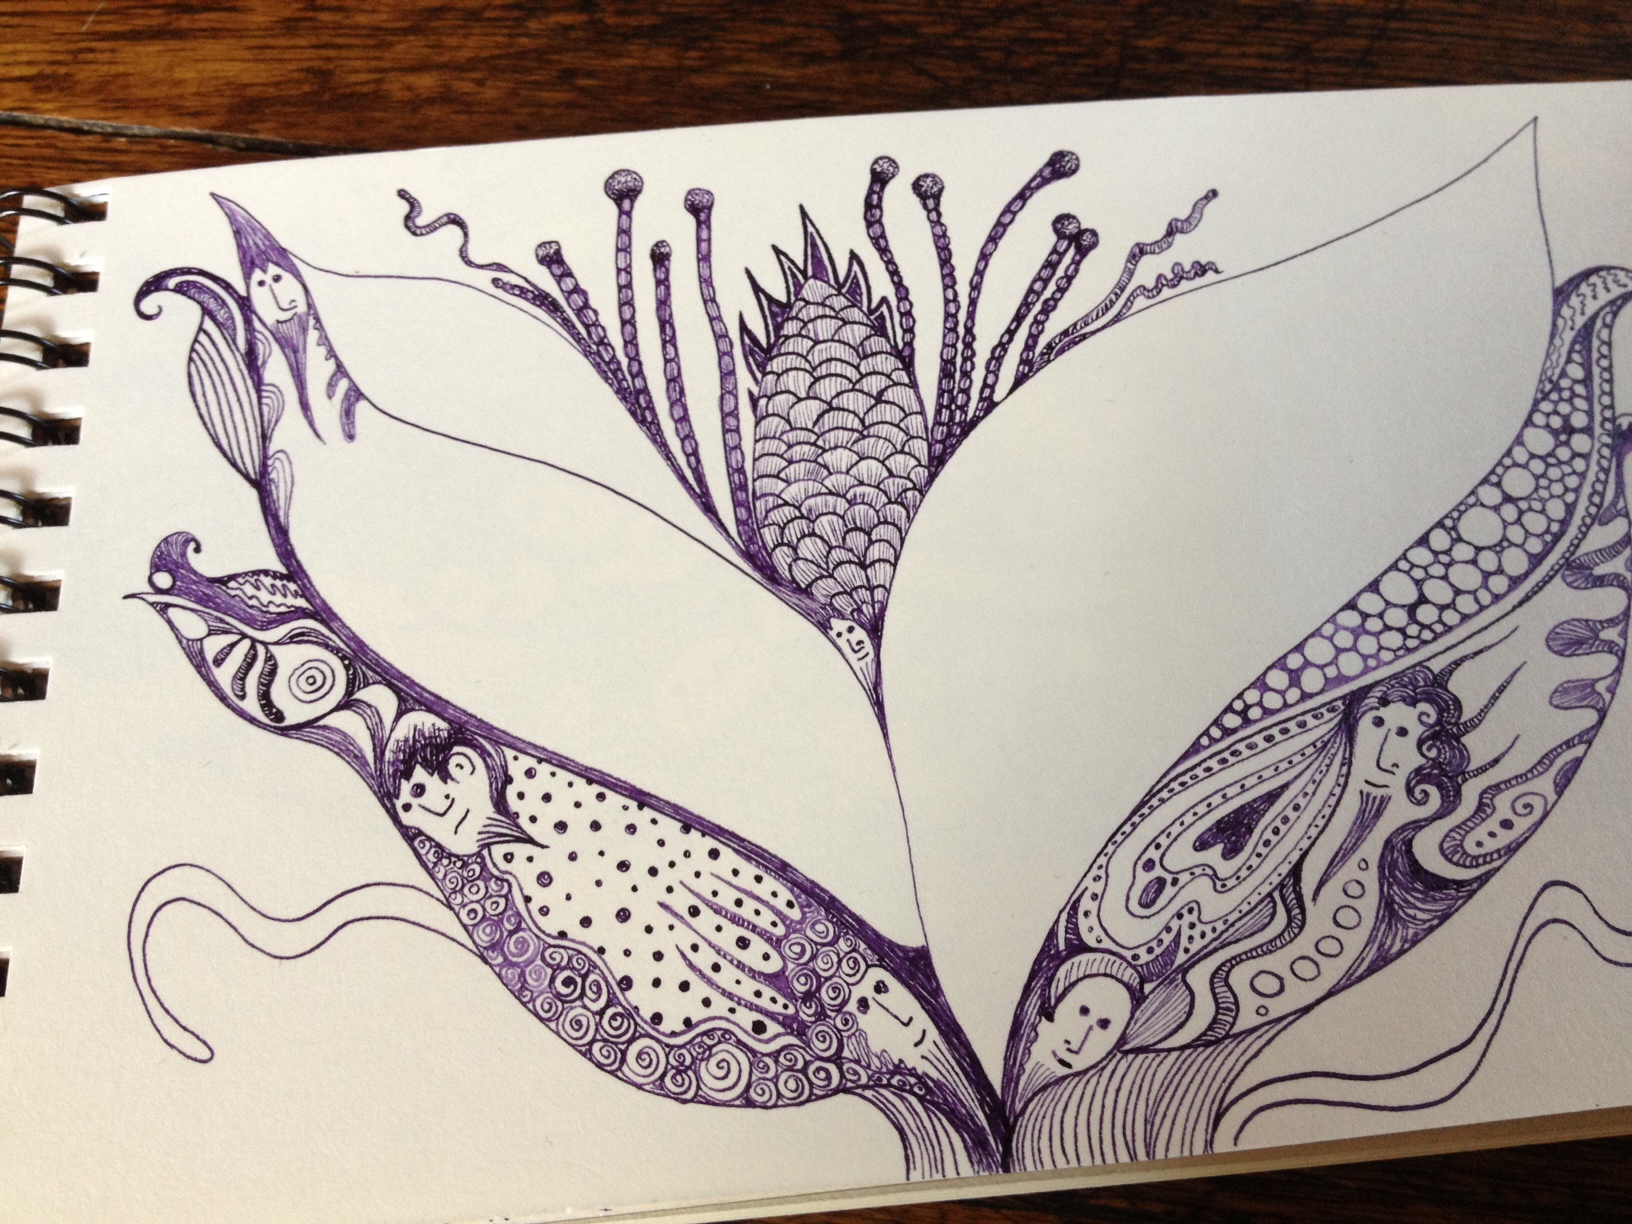
Hastily searching for a sketchbook last week, I found a 4×6 booklet behind my leopard fabric covered chair where I sit and draw. Leafing through it, I found some fun sketches I did in February 2016. With few art tools and being winter house-bound I turned to sketching between stitching to keep my mind open. Little did I know that my purple pen drawings would be found around the same time as the passing of Prince.
Prince left us in the spring of 2016. I’m lamenting the loss of this talented artist for several reasons. He and I were of the same generation. His talent and kind nature are legendary and I admire him. His legacy will continue. Enjoy the sketches!
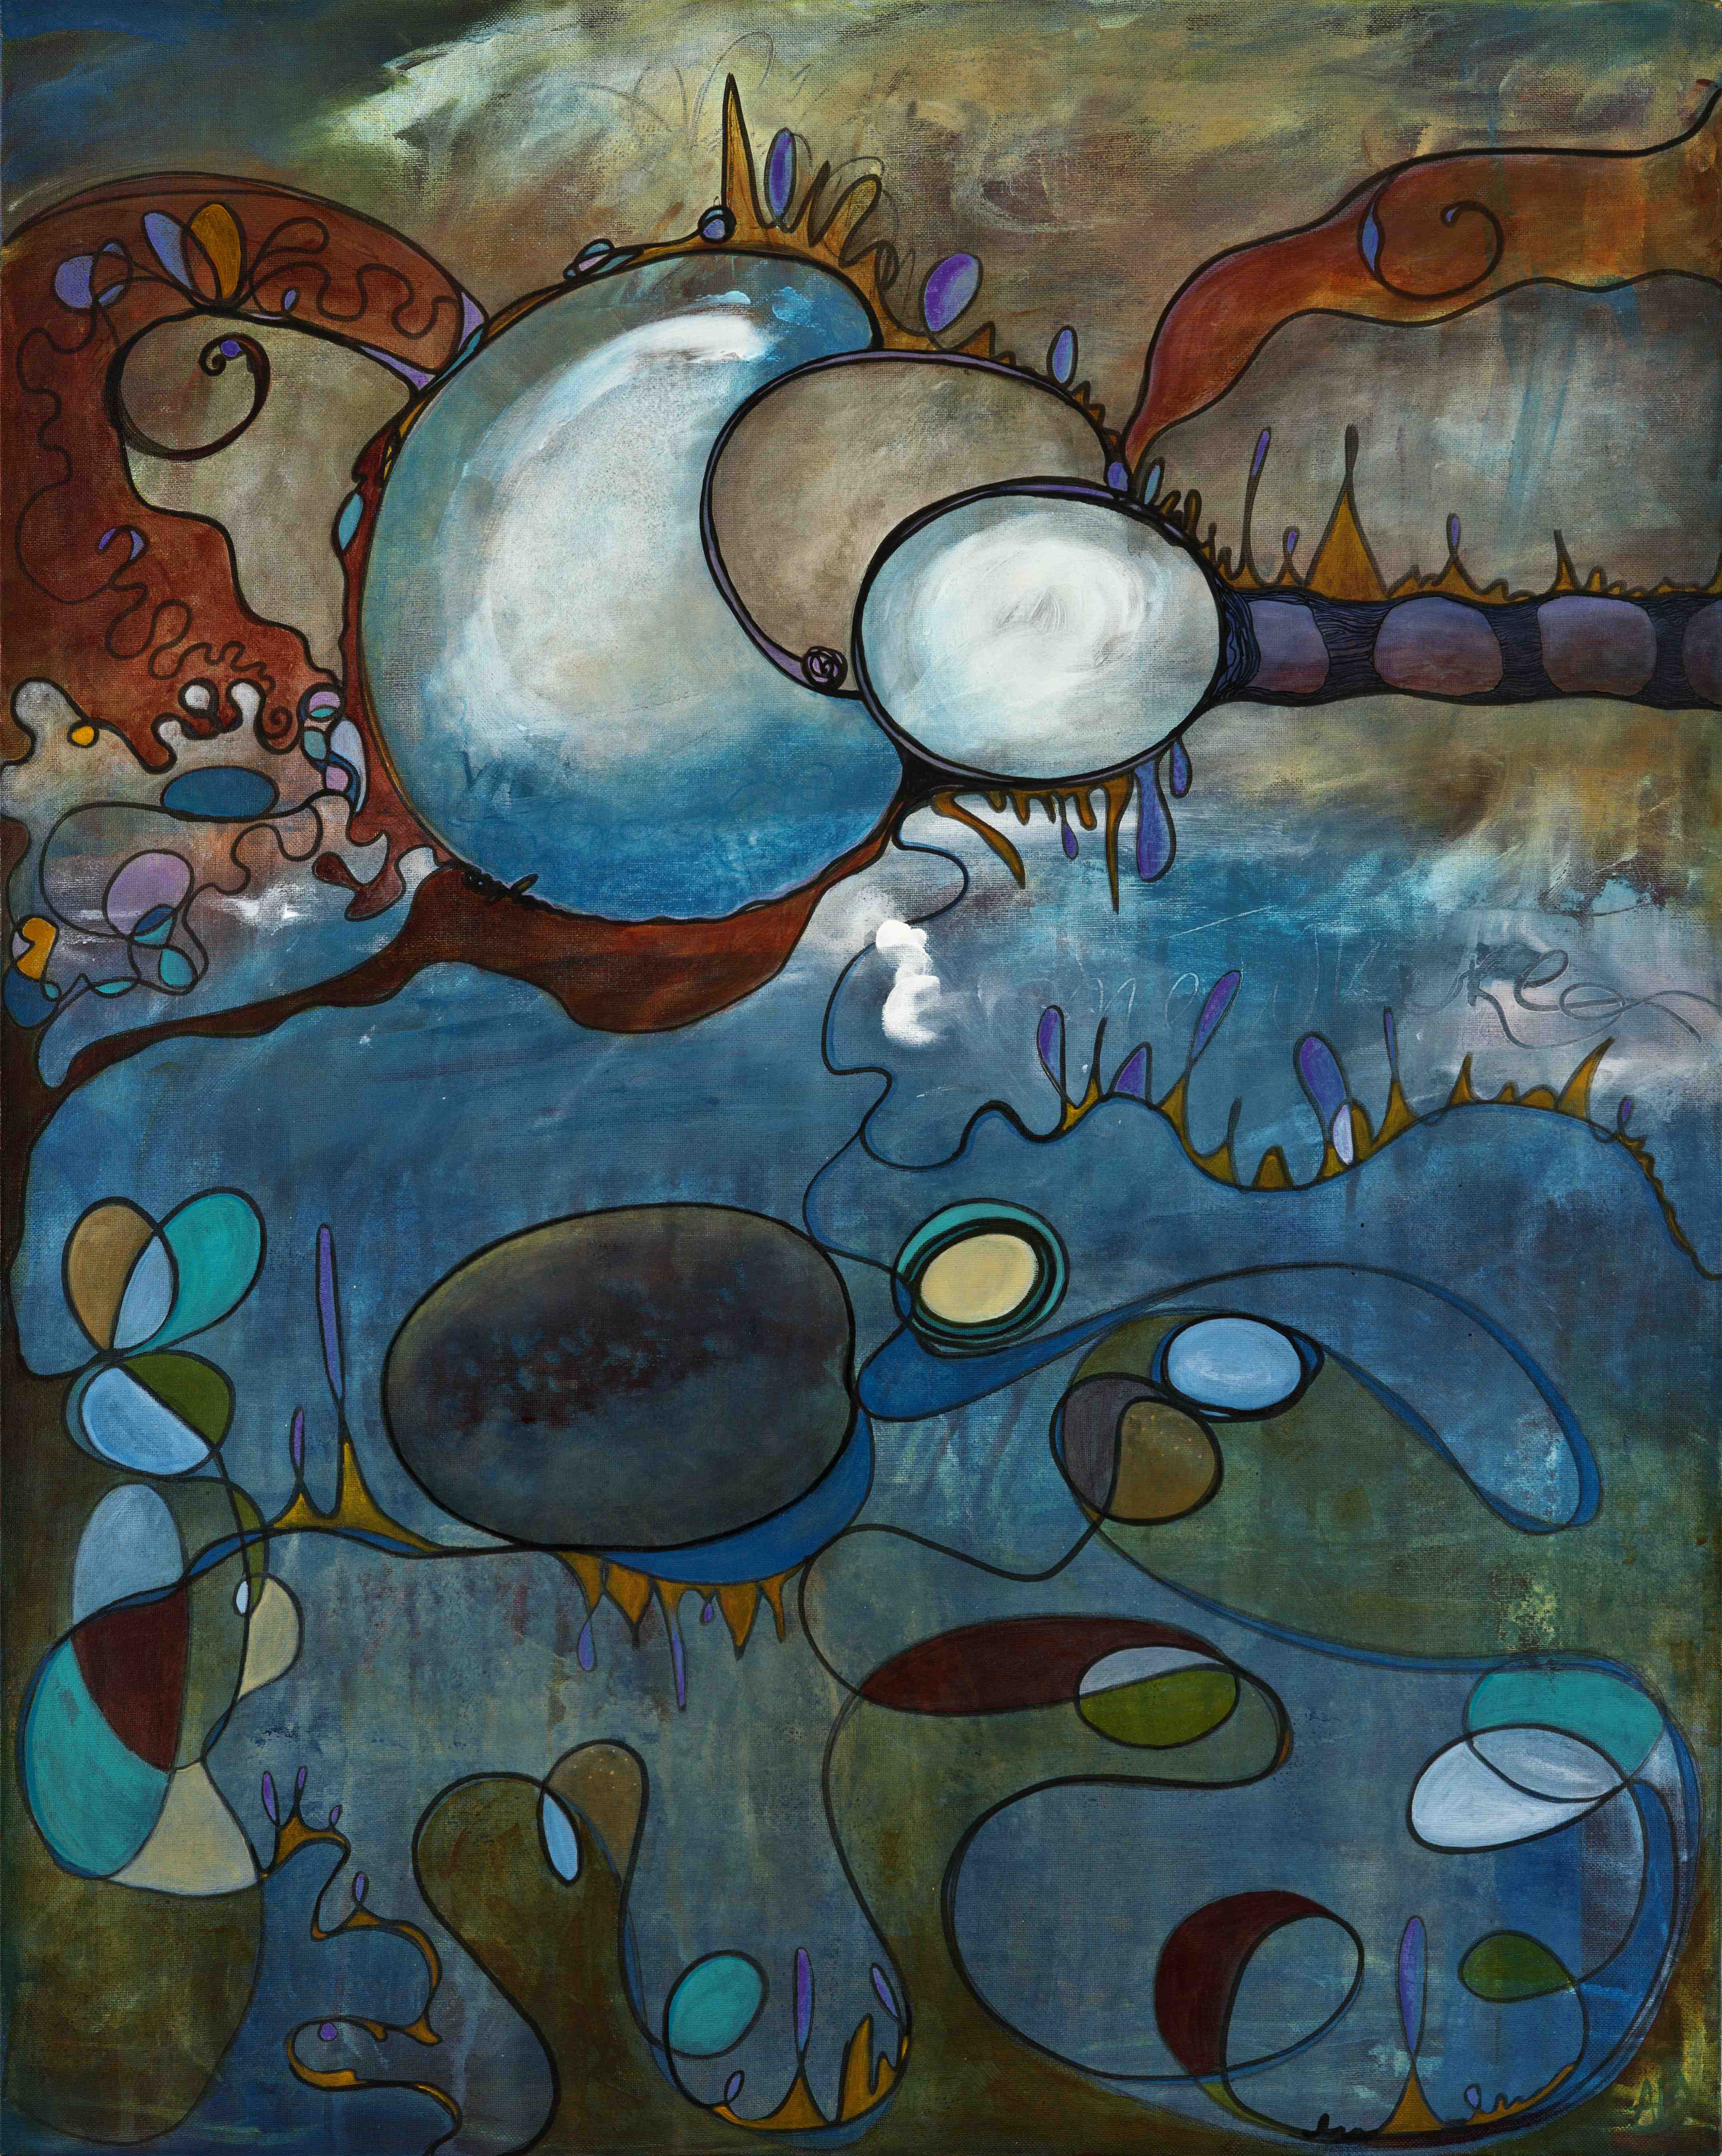
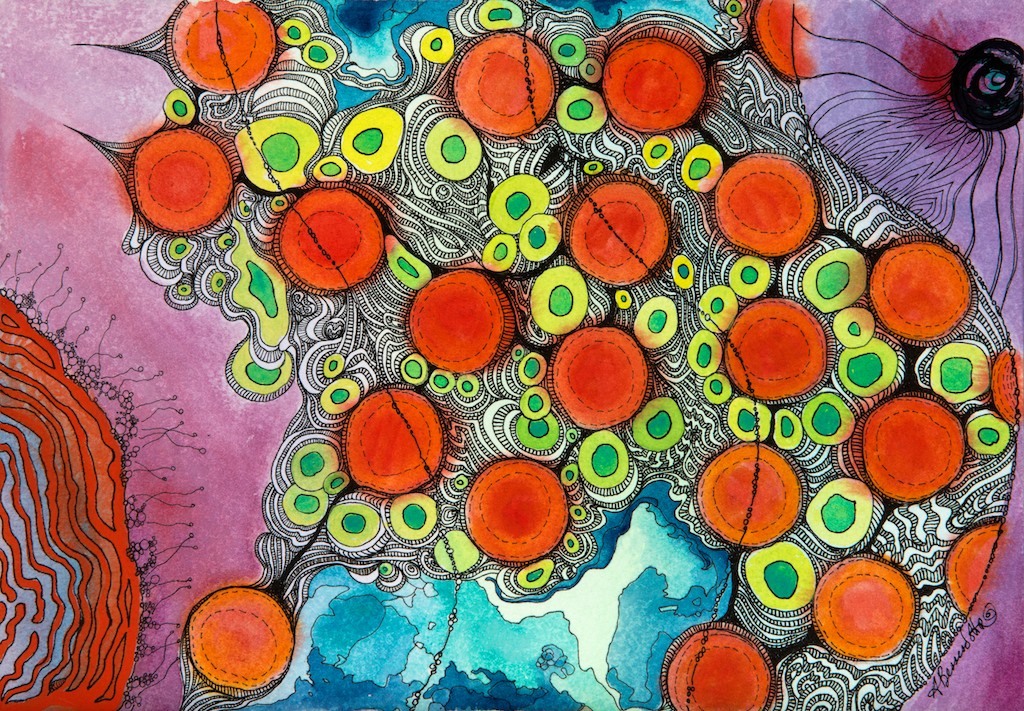
Several new series were born as a result of doing small studies this winter. The studies are being shown this weekend as a part of exhibition containing a few watercolors and some significant works in fiber that are eco-dyed, handprinted and hand embroidered. I am an irreverent quilter and don’t follow many rules. Sometimes I experiment with fusible, battings and surface design before I quilt. The purpose of it all is to find the look, I am searching many traditional techniques and then bending them to my own style to get a texture and quality that I am not ready to define yet. I’ll know it when I see it.
Cutting on the bias, using my sewing machine, or working by hand, washing, ripping, tearing, machine thread painting, hand embroidery, framing, binding, not binding, giving structure on wood panels, using bamboo to hang work, vintage silk, found objects, eco-dyeing, tea dyeing and over-dyeing, mono-printing, heliotypes, and beading are a few of the ways I am working with fabric now.
Emerging are what I call Spirit Cloth’s…they are worked in a meditative state and result in a pure form of hand and mind being one and the same, a positive flow of the spirit of the artist.
There are also images born out of my love for the earthiness of tilling and gentle farming of grains and vegetables. The works include deep night skies and are simply stitched by hand.
Its a great time for me and my need to explore what is available to me in fiber and art. Today I am scaling up one of the series and am excited to find new ways to bring the color and stitching to life…
Textiles have memory and can also take on new memory and shape. How we handle textiles, stitching by hand or machine, cutting straight, curvilinear or on the bias (diagonal), sewing curves, surface embroidery, and quilting all disrupt the weave of fabric.
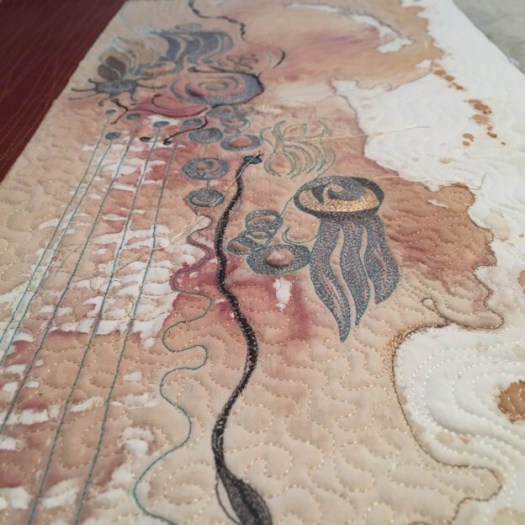
This particular quilt began with a piece of white cotton fabric hand dyed and backed with cotton batting and a muslin quilt back. If I’m not hand sewing, the cotton batting works fine for machine sewing.
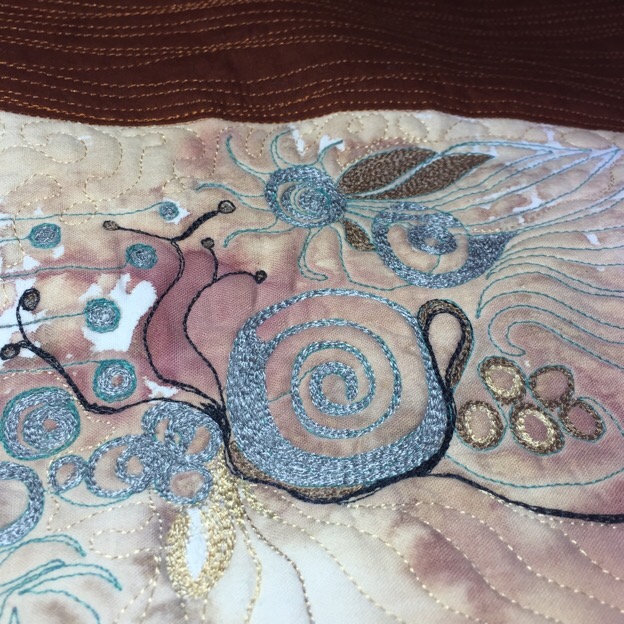
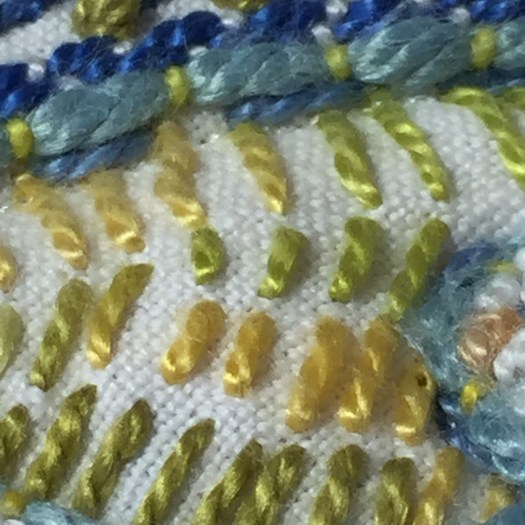
I quilted an overall pattern in a medium teal Metrosene thread and then began to add thread painting with shades of silver, graphite, burnt sienna, gold, black and bronze rayon embroidery threads. I added the top grey and bottom rust sections after the majority of the thread painting was underway.
Then the final quilting helped to flatten out the lumpy bumpy hillocks and creases left from heavy but uneven thread painting. Still wonky and now only a series of gentle rolling bumps and lumps the last step is to block before finishing. Photo below shows some of the warping that happens to fabrics that are stressed.
bumps and hillocks from quilting and thread painting
Before binding, the quilt will be dampened and blocked to de-stress the fibers and give it the shape I want it to have.
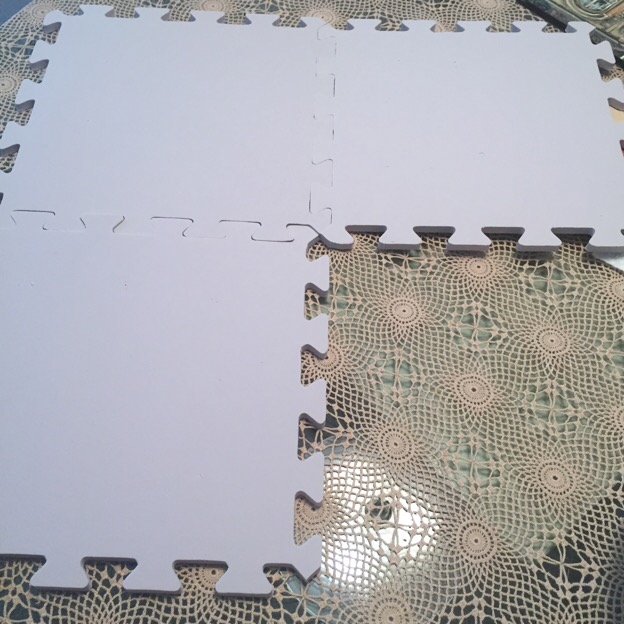
The blocks are an interlocking grid that can be used many times over. 9 foam blocks come in a pack and can be put together in many configurations. You can purchase double or triple sets if you need them for larger projects. These have a small footprint for storage and last for years. I know you can use large inexpensive insulation board or even a carpet. The insulation board comes in 8′ sheets and a carpet would need to be rolled up for storage. I don’t have that kind of extra room to store bulky objects in my studio. At $24.99 they are a good deal and they store on a shelf.
You’ll need the following:
Blocking grid or mat
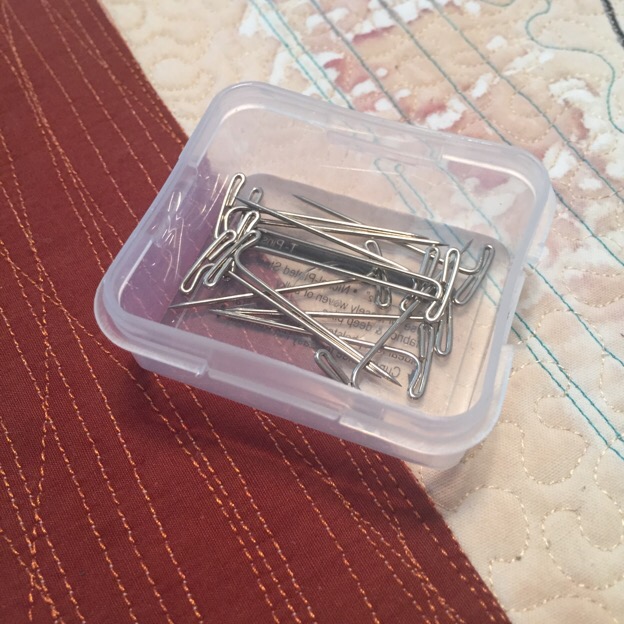
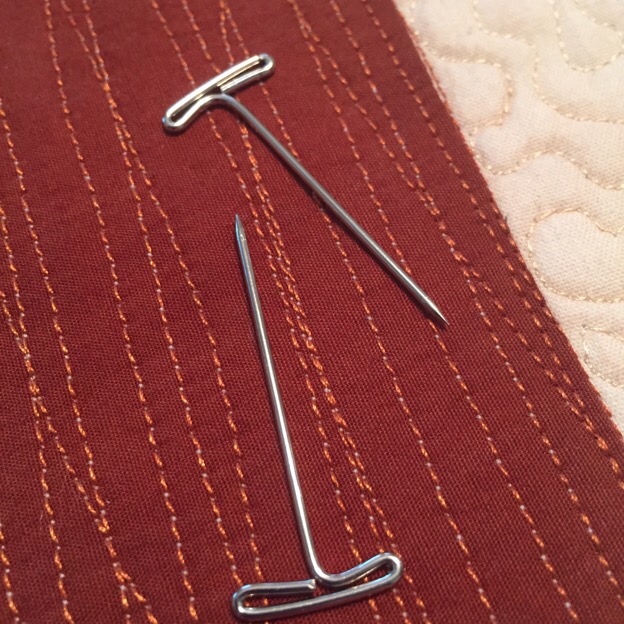
T-pins (rust proof stainless)
Spray bottle filled with fresh clean water
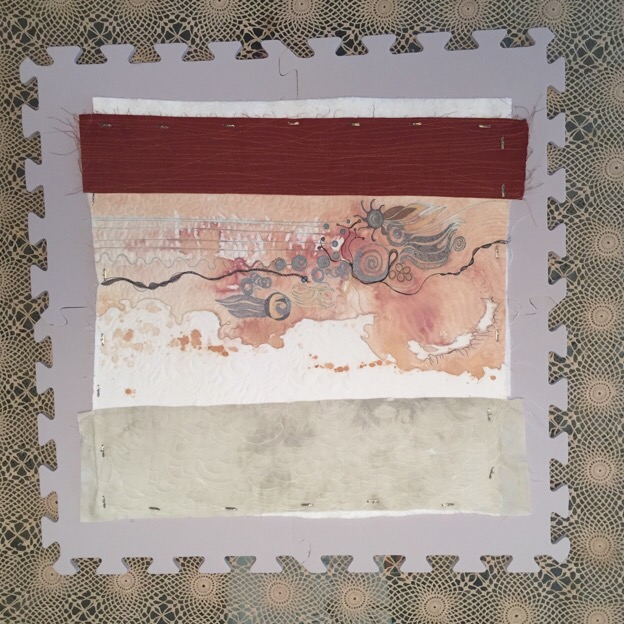
I put enough blocks together to make the grid fit the quilt in this case 4 sections work.
Placing the quilt face down I spray generously with water and smooth it out with my hands. I flip the quilt over squarely in the center of the grid and spray the top with water. It should be damp but not soaking wet.
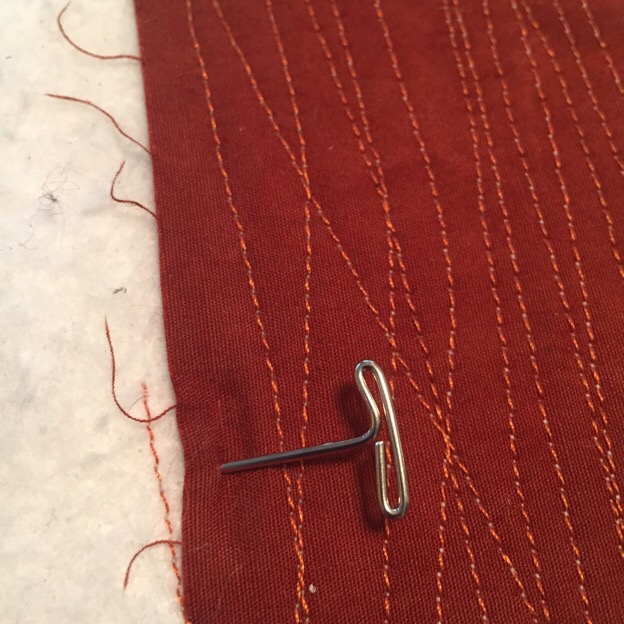
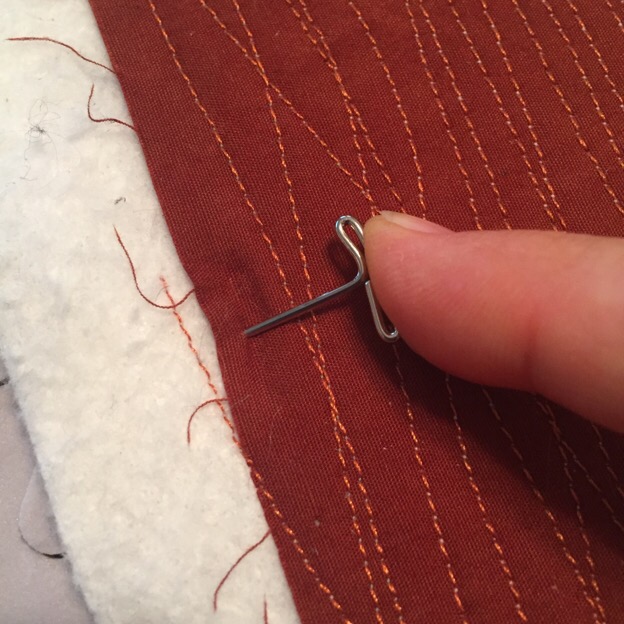
Next the pinning begins. Starting at the center of the top, taking a t-pin, I press it at an angle through the quilt edge into the foam block.
t-pin in center
final push
I continue to place a t-pin at each center point along each side–while gently stretching the quilt and smoothing it. Then push a t-pin 3″-4″ apart on each side of the center pins. Again, I gently smooth and stretch the fabric as I go. Repeat on each side until the quilt is fully but gently stretched. See the photo below – pins evenly spaced and sides of quilt look wonky. They will be trimmed after drying.
pinned, damp and ready to dry
My home is very dry and if I do this at night by morning the quilt will be dry and flat. The next step will be to trim to the size I like and bind if desired.
Below is the next day – flat and free from ripples:
Note: I do not use an iron or steam unless it is absolutely necessary. I use a mixture of fibers and a hot iron could negatively affect delicate threads or fabrics with a hot iron set on cotton and would flatten the beautiful quilting textures. I also don’t use measuring guides. These are handmade, work of art and meant to meander and have shape and texture. I am not looking for perfection, but want it to hang crisply and neatly.
People often ask how I create my watercolors. Next time I perform this process I will make a video but here is a description in the meantime.
I cover the floor with as many pieces of high quality watercolor paper that I have room for. I thoroughly wet the paper(s) with water by either using a spray bottle or large 4″ brush. This wetting is a throwback to a time when I soaked paper for printmaking. Next, I mix the colors I that feel or look good to me at the time. No planning, but I do select color based on how I am feeling at the time. I use the tools at hand, literally my own hands work the large washes along with huge mop brushes, but there are fingerprints, and a sleeve dragged (possibly) through the work during the original throwdown of paint onto paper. The brush does a loose dance and my fingertips direct the magic. I allow the wind, sand, bark or other fragments of the life from Gaia come into the work. Mother Earth has her hand in the painting as she allows a leaf to settle or insect to walk across the paper. Often I find objects or materials to use as resists. Some resists are added supplies from the kitchen–often an experiment and sometimes products that I have used before. Salt is a common additive, but oats might be chosen instead.
I allow the paint to pool in deep rich colors or pale watery shades. Then I leave. I rest and let my creations solidify. Usually, I sleep and dream about what is brewing on the paper, my dreams are strongly connected to the work at hand. I have contemplated how much my dreams direct the paint but it is speculation. My imagination though is given wings to soar from the dreams which in turn helps the creation move further along. Sometimes, at a point of partial drying I check back and add more pigments, squeezing the drops out of the brush and allowing them to fall, gravity does the work. Although I often work in series, every piece has its own method, its own manner of coming into being even though they are pointed simultaneously. They are living creatures that continue to thrive under my guidance. It is an intuitive process. I feel connected to the work and allow the paintings to emerge–letting the melange of images come forward and speak out. But its only the beginning. They need time, to flower, to open: to be interpreted further. After all the paintings are dry they are stacked and weighed to keep them flat until I am ready to proceed with adding ink. In Part 2 I will discuss the next layer – Inkwork.
“She’s in there Somewhere” 24″ x 36″ Acrylic on Canvas“She’s in there Somewhere” Acrylic on canvas.
“She’s in There Somewhere” Acrylic Painting is going to be exhibited in NYC at the Syliva Wald and Po Kim Gallery with N.A.W.A. The National Association of Women Artists. First exhibition in New York in many many years. I had a show in NYC in the early 80’s and then moved to North Carolina with my family, got married and let my art career go. It is not an unusual story for a woman to give up a career but I am thrilled to be back in the city and to be a part of a great organization like NAWA.
The piece won an award in Bucks County and sending it to New York is pretty exciting. Thanks to everyone who encouraged me to do this – as always you know who you are!
Winning an award is always cool. Happening in Bucks County–my home–is the greatest. Many thanks to the judges and The Tinicum Civic Association for making the show possible!
Regarding Sherlock Holmes and his ignorance of Copernican theory, “What the deuce is [the solar system] to me?” he exclaims to Watson in A Study in Scarlet. “You say that we go round the sun. If we went round the moon it would not make a pennyworth of difference to me or to my work.” And now that he knows that fact? “I shall do my best to forget it,” he promises.
My art is mine, its not inspired by anything in particular or anyone. Simple concept or it should be. Well just try that on in the modern world. There are labels slung at the work, me and the style. Comparisons are made with no regard to my thoughts or feelings. I prefer the enigma that naturally exists in the creation and the process. I don’t intend to create and make statements of any kind. I’m not that pretentious. I wonder who really cares about my opinion…and do I actually care to use my precious work as a tool to provide statements to the public? If you’re a long standing friend we may find ourselves discussing it but otherwise I’m likely to say a little when queried about the art I make.
The reference to Sherlock Holmes? I read Conan Doyle in my youth and the realization of what Holmes referred to in the Copernicus statement stuck with me. What do I need to know–to shape my life as I want it to be….and what do I need to forget? I don’t want to know about the art that came before me or even really of what is being created right now. Keeping it simple, I have little need to know about artists, it impedes my progress, infiltrates my brain and I fight to keep it out. I’ve been told that I’m wrong, that if I had gone to art school or college I would know that I should build on the structure of artist who created before me. Now I have to forget that too! I met Ian Frazier several times and he told me he has had a similar experience. He said the internet contains so much information its difficult to filter when doing research for his writing. I explained my Holmes theory to him and he chuckled and nodded his head.
To all who know me, please stop telling me to change my mind on this subject. I paid dearly to avoid art school. I consider myself an iconoclast and being institutionalized doesn’t work for me. While working low paying full time jobs, I painted during my precious time off. Not having knowledge of art history doesn’t make me not bright. Figuring out processes by experimentation doesn’t make my work unsophisticated. It does make me an outsider for the most part. What I didn’t get by going to college…I struggled, worked hard and experimented a lot. I found out that I am an innovator, a risk taker and improvise on every piece I make. I’m happy with my work and proud of what I do. I am pleased and humbled every time someone acquires a piece. I’m impressed with those who collect my art, as they are an extraordinary group of people.
Phantasmagoric or Psychedelic? People are intrigued by my art and ask me if I do psychedelics. I explain: as a child I made art similar to this, less refined because my tools were different: crayons, felt tip pens, construction paper. I adored colors that had impact and vibrated, there was no direction, my mother let us explore and no one told me do or don’t do it this way. So I let the colors come into being together like living objects. Wild!
I continued to make art the same way and did not go to college for art. I disliked school. I did not want to be contained. From the age of 4 I refused to go, plead and begged not to be sent to a place that had the sticky odors of too many people and cafeteria foods. I had little understanding of what we were doing there. The aesthetic was dismal: it was cold and the light was harsh, the windows were too high to see out of, the desks were ugly metal grey-blue legs with beige plastic formica tops that lifted up and were pitted with the marks of the previous students. The rooms were not colorless, worse yet, they were badly colored, sickly shades of greens and tans, dull peaches and obscure reds. I cannot imagine what kind of people engineered such a hideous stinky place. School left an indelible mark on me and is responsible for my becoming an iconoclast. I refused to go to college for art because I knew I would be forced to bend to the will of commercialism.
Creating the art however had all the appeal – I would simply make it – I was the engineer of my visions and dreams. Without the prodding and lecturing of the teachers I would remain free. As an adult in my thirties I finally went to college for computer science. I was old enough at that point to be settled and confident that I would retain my sense of self throughout the process. Later, in my mid-forties I took a few basic art classes. One of my professors championed my own art when he saw my portfolio. That made my decision to forget a degree in art–and I just continued my own methods.
As an artist, I consider myself an outsider, self-taught and making art according to my standard. A Wild Artist is what I call myself. Wildish: free, lush, luxuriant, organic, extravagant, primeval. The underpaintings are turbulent and loose, free of conformity, I paint with my hands and use anything at hand to distribute the color. Then come the layers. The lines of ink, more paint, more, more more. People have said, how can you be an outsider, you are so skilled and the work is so refined. They don’t see the whole process–and I am skilled. Dexterity, spatial skills, innate sense of color and balance. I cannot tell you how or why I know how to create what I do. I don’t actually care. The Art Speaks for itself. The artist is Self-taught. Driven. Compelled to create. Its non-stop–when I am forced by life to do ordinary tasks, drive or do the laundry, I wish I was painting or drawing–and use many spare moments to scratch a few lines. Many who know me, patiently overlook my tendency to draw while we talk or eat dinner. Its not that I am bored at dinner so much as I am compelled to make art. People have asked, do you have a science background. I do not. These images come from the ether, my imagination, my hands and my heart. Its untamed, yet its refined at the same time. I say its Wild!
I am working on the old wooden table from the Log and Stone house today. The windows are open and I am surrounded by the gardens: the birds chippering lingers on the fresh air. The drawing that I am playing with this morning is a flower somewhat like a magnolia flower, although its as folkly abstract as most of my drawings are. I so admired the large waxy magnolia blooms when I lived in North Carolina. I can imagine the little creatures shyly cloistered in the petals and making their home in the tree.
Recently I got a bottle of Dr. Ph. Martin’s Bombay India Ink in Violet, or as my friend Cleveland named it Vivacious Violet and a booklet of Strathmore Drawing paper in the 4″ x 6″ size. I thought that I would use the violet ink everyday and complete a series of 24 small drawings. I also got a bottle of green ink. So far, 3 are done and 2 are in the hands of some very special people.


 Several new series were born as a result of doing small studies this winter. The studies are being shown this weekend as a part of exhibition containing a few watercolors and some significant works in fiber that are eco-dyed, handprinted and hand embroidered. I am an irreverent quilter and don’t follow many rules. Sometimes I experiment with fusible, battings and surface design before I quilt. The purpose of it all is to find the look, I am searching many traditional techniques and then bending them to my own style to get a texture and quality that I am not ready to define yet. I’ll know it when I see it.
 Emerging are what I call Spirit Cloth’s…they are worked in a meditative state and result in a pure form of hand and mind being one and the same, a positive flow of the spirit of the artist.